
Transformers documentation
零样本目标检测
零样本目标检测
传统上,用于目标检测的模型需要带标签的图像数据集进行训练,并且只能检测训练数据中定义的类别集合。
零样本目标检测是一种计算机视觉任务,旨在检测图像中的对象及其类别,且无需任何先验训练或类别知识。零样本目标检测模型以图像和候选类别列表作为输入,输出检测到的对象的边界框和标签。
Hugging Face 托管了许多此类开放词汇零样本目标检测器。
在本指南中,您将学习如何使用此类模型:
- 根据文本提示检测对象
- 用于批量目标检测
- 用于图像引导的目标检测
在开始之前,请确保已安装所有必要的库:
pip install -q transformers
零样本目标检测流水线
尝试使用模型进行推理的最简单方法是将其用于 pipeline() 中。从 Hugging Face Hub 上的检查点 实例化一个用于零样本目标检测的 pipeline:
>>> from transformers import pipeline

>>> # Use any checkpoint from the hf.co/models?pipeline_tag=zero-shot-object-detection
>>> checkpoint = "iSEE-Laboratory/llmdet_large"
>>> detector = pipeline(model=checkpoint, task="zero-shot-object-detection")
接下来,选择一张您想要进行目标检测的图像。这里我们将使用 NASA Great Images 数据集中宇航员 Eileen Collins 的图像。
>>> from transformers.image_utils import load_image

>>> url = "https://huggingface.co/datasets/huggingface/documentation-images/resolve/main/transformers/tasks/zero-sh-obj-detection_1.png"
>>> image = load_image(url)
>>> image
将图像和要查找的候选对象标签传入 pipeline。 这里我们直接传入图像;其他合适的选项包括图像的本地路径或图像 URL。我们还传入了所有希望查询图像中是否包含的物品的文本描述。
>>> predictions = detector(
...     image,
...     candidate_labels=["human face", "rocket", "nasa badge", "star-spangled banner"],
...     threshold=0.45,
... )
>>> predictions
[{'score': 0.8409242033958435,
  'label': 'human face',
  'box': {'xmin': 179, 'ymin': 74, 'xmax': 272, 'ymax': 179}},
 {'score': 0.7380027770996094,
  'label': 'rocket',
  'box': {'xmin': 353, 'ymin': 0, 'xmax': 466, 'ymax': 284}},
 {'score': 0.5850900411605835,
  'label': 'star-spangled banner',
  'box': {'xmin': 0, 'ymin': 0, 'xmax': 96, 'ymax': 511}},
 {'score': 0.5697067975997925,
  'label': 'human face',
  'box': {'xmin': 18, 'ymin': 15, 'xmax': 366, 'ymax': 511}},
 {'score': 0.47813931107521057,
  'label': 'star-spangled banner',
  'box': {'xmin': 353, 'ymin': 0, 'xmax': 459, 'ymax': 274}},
 {'score': 0.46597740054130554,
  'label': 'nasa badge',
  'box': {'xmin': 353, 'ymin': 0, 'xmax': 462, 'ymax': 279}},
 {'score': 0.4585932493209839,
  'label': 'nasa badge',
  'box': {'xmin': 132, 'ymin': 348, 'xmax': 208, 'ymax': 423}}]
让我们可视化预测结果:
>>> from PIL import ImageDraw

>>> draw = ImageDraw.Draw(image)

>>> for prediction in predictions:
...     box = prediction["box"]
...     label = prediction["label"]
...     score = prediction["score"]

...     xmin, ymin, xmax, ymax = box.values()
...     draw.rectangle((xmin, ymin, xmax, ymax), outline="red", width=1)
...     draw.text((xmin, ymin), f"{label}: {round(score,2)}", fill="white")

>>> image
手动实现基于文本提示的零样本目标检测
现在你已经了解了如何使用零样本目标检测流水线,让我们手动复现相同的结果。
首先,从Hugging Face Hub 上的检查点加载模型及其关联的处理器。 这里我们将使用与之前相同的检查点:
>>> from transformers import AutoProcessor, AutoModelForZeroShotObjectDetection

>>> model = AutoModelForZeroShotObjectDetection.from_pretrained(checkpoint, device_map="auto")
>>> processor = AutoProcessor.from_pretrained(checkpoint)
让我们换一张不同的图片来变换一下花样。
>>> url = "https://huggingface.co/datasets/huggingface/documentation-images/resolve/main/transformers/tasks/zero-sh-obj-detection_3.png"
>>> image = load_image(url)
>>> image
使用处理器为模型准备输入。
>>> text_labels = ["hat", "book", "sunglasses", "camera"]
>>> inputs = processor(text=text_labels, images=image, return_tensors="pt").to(model.device)
将输入数据传入模型,进行后处理,并可视化结果。由于图像处理器在将图像送入模型之前对其进行了缩放,因此您需要使用 post_process_object_detection 方法,以确保预测的边界框相对于原始图像具有正确的坐标:
>>> import torch

>>> with torch.inference_mode():
...     outputs = model(**inputs)

>>> results = processor.post_process_grounded_object_detection(
...    outputs, threshold=0.50, target_sizes=[(image.height, image.width)], text_labels=text_labels,
... )[0]

>>> draw = ImageDraw.Draw(image)

>>> scores = results["scores"]
>>> text_labels = results["text_labels"]
>>> boxes = results["boxes"]

>>> for box, score, text_label in zip(boxes, scores, text_labels):
...     xmin, ymin, xmax, ymax = box
...     draw.rectangle((xmin, ymin, xmax, ymax), outline="red", width=1)
...     draw.text((xmin, ymin), f"{text_label}: {round(score.item(),2)}", fill="white")

>>> image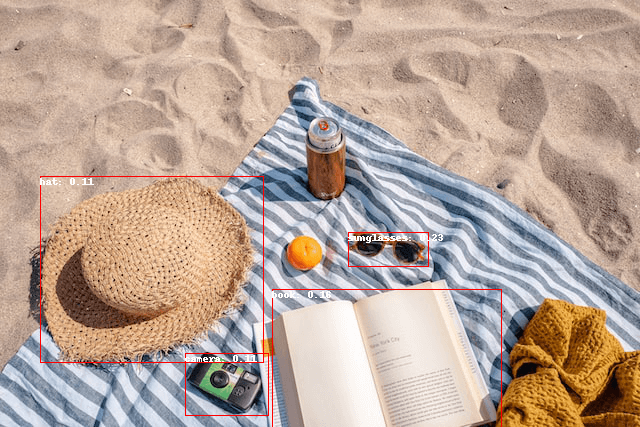
批处理
您可以传入多组图像和文本查询,以在若干图像中搜索不同的(或相同的)对象。 让我们同时使用一张宇航员图像和一张海滩图像。 对于批处理,您应该将文本查询作为嵌套列表传入处理器,并将图像作为 PIL 图像列表、PyTorch 张量或 NumPy 数组传入。
>>> url1 = "https://huggingface.co/datasets/huggingface/documentation-images/resolve/main/transformers/tasks/zero-sh-obj-detection_1.png"
>>> url2 = "https://huggingface.co/datasets/huggingface/documentation-images/resolve/main/transformers/tasks/zero-sh-obj-detection_3.png"
>>> images = [load_image(url1), load_image(url2)]
>>> text_queries = [
...     ["human face", "rocket", "nasa badge", "star-spangled banner"],
...     ["hat", "book", "sunglasses", "camera", "can"],
... ]
>>> inputs = processor(text=text_queries, images=images, return_tensors="pt", padding=True)之前在后处理中,你传入的是单张图像的尺寸张量,但也可以传入元组;对于多张图像的情况,则可以传入元组列表。下面我们来为这两个示例创建预测结果,并可视化第二个示例(image_idx = 1)。
>>> with torch.no_grad():
>>>     outputs = model(**inputs)

>>> target_sizes = [(image.height, image.width) for image in images]
>>> results = processor.post_process_grounded_object_detection(
...     outputs, threshold=0.3, target_sizes=target_sizes, text_labels=text_labels,
... )
让我们可视化结果:
>>> image_idx = 1
>>> draw = ImageDraw.Draw(images[image_idx])

>>> scores = results[image_idx]["scores"].tolist()
>>> text_labels = results[image_idx]["text_labels"]
>>> boxes = results[image_idx]["boxes"].tolist()

>>> for box, score, text_label in zip(boxes, scores, text_labels):
>>>     xmin, ymin, xmax, ymax = box
>>>     draw.rectangle((xmin, ymin, xmax, ymax), outline="red", width=1)
>>>     draw.text((xmin, ymin), f"{text_label}: {round(score,2)}", fill="white")

>>> images[image_idx]
图像引导的目标检测
除了使用文本查询进行零样本目标检测外,OWL-ViT 和 OWLv2 等模型还支持图像引导的目标检测。这意味着你可以使用图像查询在目标图像中查找相似的对象。
>>> from transformers import AutoProcessor, AutoModelForZeroShotObjectDetection

>>> checkpoint = "google/owlv2-base-patch16-ensemble"
>>> model = AutoModelForZeroShotObjectDetection.from_pretrained(checkpoint, device_map="auto")
>>> processor = AutoProcessor.from_pretrained(checkpoint)
与文本查询不同,仅允许使用单张示例图像。
让我们以一张沙发上两只猫的图片作为目标图像,以一张单只猫的图片作为查询图像:
>>> url = "http://images.cocodataset.org/val2017/000000039769.jpg"
>>> image_target = Image.open(requests.get(url, stream=True).raw)

>>> query_url = "http://images.cocodataset.org/val2017/000000524280.jpg"
>>> query_image = Image.open(requests.get(query_url, stream=True).raw)
让我们快速看一下这些图像:
>>> import matplotlib.pyplot as plt

>>> fig, ax = plt.subplots(1, 2)
>>> ax[0].imshow(image_target)
>>> ax[1].imshow(query_image)
>>> fig.show()
在预处理步骤中,现在需要使用 query_images 来替代文本查询:
>>> inputs = processor(images=image_target, query_images=query_image, return_tensors="pt")对于预测,请将输入传递给 image_guided_detection(),而不是传递给模型。像之前一样绘制预测结果,但现在没有标签。
>>> with torch.no_grad():
...     outputs = model.image_guided_detection(**inputs)
...     target_sizes = torch.tensor([image_target.size[::-1]])
...     results = processor.post_process_image_guided_detection(outputs=outputs, target_sizes=target_sizes)[0]

>>> draw = ImageDraw.Draw(image_target)

>>> scores = results["scores"].tolist()
>>> boxes = results["boxes"].tolist()

>>> for box, score in zip(boxes, scores):
...     xmin, ymin, xmax, ymax = box
...     draw.rectangle((xmin, ymin, xmax, ymax), outline="white", width=4)

>>> image_target